Monthly Archives: November 2014

Post 34: The new self imposed security wave – taking time-out to choose a safe routeOat and Amaranth-Crusted Cheese Quiche-from the Grain Council

I sadly examined several past blogs. Post 31 is prescient of a wave of mistrust oozing into the hearts of Jerusalem’s citizens. How can we live our lives and enjoy the good here? We fight back with our own disciplined self security wave.

Exactly. B’Diuk. We fight back by keeping up our meetings and dinners with friends and find ways to go out at night in groups and try to feel like it was. But it never will really be like it was.

We find new ways. Last week, I was part of a group of women leaving a party at midnight and strolling home. It was a twenty minute walk. We took the short route.

I had misgivings about taking that route. I almost voiced an objection. But who was I to say, “Wait a minute, this street is not so safe, considering this that and the other thing.” We were a group of about five and the walk gave me a chance to make some mental notes. Next time I pass the street I will take photographs. One cannot base a street walk decision merely on Google’s suggestion. I also spoke to my friend latter who had recommended the route. She offered, “It only takes 5 minutes to run up that street.” Then I pointed out the perils of walking in a group or alone, even for one minute and she admitted that I had made a valid point.

The street that friends and I frequented that early Sunday morning, and one that I traversed  many times is now off-limits, at night. Why? That street, Helena HaMalka in Musrara, has many dark alleys off of it. Before the new construction,  boisterous bars dotted the area. Funny that I would consider them a form of protection. Now there are only antique structures bordering the road.  The Broadcasting Authority uses most of the street. In the evening there is not a single Shomir or duty along the entire block. Also the street offers one lane of traffic. If an attacker jumped out of a car one would have no means of escape. There are no clothes lines stretching from the buildings adjoining the Broadcasting Authority, to indicate residents, hence no resident block-watchers. The opposite side of the street also offers only more of the same, a wall of barbed wire fencing, the periphery  of the Russian Compound. The whole general area is undergoing construction of a new Betzalel Art School conspicuously without residents.

YES, I will be attending a dinner with friends, at 4PM earlier than usual, on December 1st: The bus will leave me about 200 meters from my destination. Please share your feelings about the security situation in Jerusalem. Have you also changed your normal route? Do you perhaps take a route that takes longer but you feel safer taking it? Do you also shy away from specific streets during evening hours? Do we expect to see security personnel throughout the city?

Every time we shun a social evening out, we are loosing our streets. Your comments will be placed on a future post.


Let’s Get Together!

Potluck Dinner

This Monday, Dec. 1, 9th of Kislev

4 pm [new time]
Sager,’s Home, Derech Hevron 92
RSVP to Ruth: 02-566-2186
Can’t wait to see you! Do come!

Oat and Amaranth-Crusted Vegetable Quiche (Not macrobiotic) Oat and Amaranth-Crusted Ham and Cheese Quiche

Lorna Sass

This unusual cracker-like, protein-rich crust offers the pleasing sweetness of oats, and amaranth’s hint of corn.

INGREDIENTS

For the Crust
1/2 cup old-fashioned rolled oats
1/2 cup beige amaranth
1/2 tsp. salt
3 Tbsp. unsalted butter/olive oil, melted, plus more for preparing the pie dish
2 to 4 Tbsp. ice-cold water
1 large egg white, lightly beaten (save the yolk for the filling)/ ground flax seed with almond milk can be substituted.

For the filling
2 large eggs beaten
1 cup almond milk
175 gr. roasted butternut squash mashed
1/8 tsp. salt
2 cups ricotta

INSTRUCTIONS

1. Place the rack in the center of the toaster oven and preheat to 350?F. Line with aluminum foil and baking paper  and oil an a 9-inch cheesecake aluminum cheesecake form. Set aside.

2. To make the crust, grind the oats into a fine flour in a spice grinder or blender. Transfer to a medium-sized bowl.

3. Heat a large skillet. Add the amaranth and stir constantly until the seeds begin to pop and smell toasty, about 3 minutes. Remove from hear and pour into a small bowl to cool. Transfer half to a spice grinder or blender and grind them into a fairly fine flour. (The amaranth flour may be slightly coarser that then oat flour.) Transfer the flour to the bowl with the oat flour, and then grind the second batch of popped amaranth.

4. Add the second batch of amaranth flour and the salt to the bowl. While stirring, gradually add the melted oil. Stir in 2 Tbsp. of the cold water. Add more water, if needed, to create a dough that holds its shape when pressed together.

5. Press the dough evenly, about 1/4-inch thick, onto the bottom and up the sides of the cheese cake pan. Bake for 15 minutes. Liberally coat the pie crust with the egg white, taking care to fill in any cracks. Return to the oven for 1 minute. Set on a cooling rack. Keep the oven on.

6. Prepare the filling, in a bowl, mix the filling ingredients.

7. Pour that mixture on top of the crust. Bake until the top is browned and the center is set, 30 to 40 minutes. Let cool on a rack for 5 to 10 minutes before slicing into portions.

Variations:  Use olive, corn, or peanut oil instead of melted butter for the crust. For macrobiotics, omit the cheese and eggs. Use tofu or tempeh.

Recipe inspired by Lorna Sass, from Whole Grains Every Day, Every Way. The original recipe had 1400 mg. Sodium per serving!

Post 33: East Meets West continued-demonstration and nut-cheese making. Fun at the Train Station

There was a  demonstration  awhile back at the First Train Station — a Japanese chef together with an Israeli chef.  It was crowded and a little hard to see and hear, but here is a recreation of  the recipes they did. (Helpful observations by Klara Le Vine):

One dish was a kind of ersatz tofu made out of kuzu: 1 c. water, 1/4 c. kuzu, and 11/2 T. tahina (I added a pinch of salt. It’s cooked together until it forms a blob, stirring constantly, then spread out in a pan, chilled, and cut into cubes.
It was served with a sauce of mirin, shoyu, and maybe a little vinegar (I didn’t catch the sauce ingredients exactly).   The other things they made were steamed green beans with a dressing of ground toasted black sesame, again with shoyu and mirin (I think) and deep–fried tofu dumplings: mashed tofu with cooked carrots and cooked shitake, deep-fried in balls and served with a dipping sauce of the vegetable cooking broth (which also had kombu in it) seasoned with shoyu, grated ginger, and grated radish. 
 Hi-any comments on this recipe? Has anyone got another cheese from nuts recipe?

Basic Raw Vegan Cheese

Whole Foods Cooking Expert
chevre-on-bread-getty.jpg - Courtesy of Getty Images

es

Creamy, rich and delicious, and a wonderful blank canvas for other flavors, this recipe for basic raw vegan cheese is very easy to make. The only real time requirement is letting it culture and drain for 24 hours. If you don’t have a high powered blender like Vitamix or Blendtec, consider soaking the nuts for 8 hours at room temperature, then discarding the soaking water and starting from there. You’ll also need cheesecloth (or nut milk bag or paint strainer), a colander and a container or deep plate that the colander can sit over.

INGREDIENTS
  • 3/4 cup raw cashews
  • 3/4 cup raw macadamia nuts
  • 1 cup minus 1 tablespoon of filtered water
  • Pinch of good quality sea salt
  • Herbes de Provence, cracked pepper, pepper flakes or chopped fresh herbs
  • Prep Time: 5 minutes
  • Resting: 1,440 minutes= about 24 hours
PREPARATION

Place the nuts, filtered water and a pinch of sea salt in your blender. (If you’re not using a Blendtec or Vitamix, you may need to stop blending a few times to scrape down the sides of the blender with a rubber spatula.) Blend until the mixture is very creamy.

Pour the nut mixture into a double thickness of cheesecloth or into the nut bag, and twist the ends (or top of the bag) until the puree is completely sealed in at the top and cannot come undone once a weight is placed on top of it.

Place the bag in the colander, and the colander over a bowl or deep plate. Place some sort of weight on top of the bag of nut mixture. A small pot or bowl that fits inside the colander is a good idea, and you can weight it down with a few rocks ins
Chill the mixture for an hour or two. Remove it from the cheesecloth, and discard any liquid in the bowl.Place the colander in a cupboard or dark, draft free place to drain for 24 hours.

Shape the cheese into 2 small loaves.  Roll the logs in any mixture of fresh or dry herbs, cracked pepper or pepper flakes that appeals to you, or leave it plain.

Chill until ready to serve.

Enjoy!

Makes about 8 ounces of nut cheese

Copyright 2014 by Jen Hoy

Post 37: Read about one of the world’s largest Chanakiyot in the Bukharin Shuk, Jerusalem. The owner of the hardware store and collection is Shabtay Yossef http://www.jr.co.il/articles/the-chanukiyot-collection-in-bukharim-jerusalem.htm and by popular demand Vegetables in a cake : Adzuki Bean Ricotta Cheesecake and Creamy Bean Amaranth Soup for a chilly night

Posted link, article and photographs compliments of Jacob Richman. Thank you!

Shabtay Yossef is a collector.
He probably has one of the largest Chanukiyot collections in the world.
He has Chanukiyot from 75 countries.

Rather than post the story here’s the link:

http://www.jr.co.il/articles/the-chanukiyot-collection-in-bukharim-jerusalem.htm

A Dairy alternative to Latkas:

Adzuki Bean Ricotta Cheesecake

Ingredients:

4 leaves of filo dough

175 grams of roasted butternut squash

2 tab. Canola Oil

2 tab. Toffuti Sour Cream

2 cups frozen blueberries and cherries defrosted. Hold the syrup.

2 Tab. Kuzo (Wild Japanese arrowroot).

1/2 cup dried blueberries/cranberries.

2 cups ricotta cheese (app 900 grams).

3/4 cup cooked adzuki beans run through a food processor

Peel of one lemon.

3 tab. cream cheese

2 ripe bananas mashed in small chunks 3 eggs beaten

1/4 cup toasted pine nuts

Instructions:

Bake the shell in a spring form pan in a preheated toaster one at 160 C about 10 minutes, watching to see that the thin filo doesn’t burn. Set aside to cool. After you have poured in the filling cover outer rim with aluminum foil strips to prevent burning during baking.

Grate lemon peel.

In the same bowl, use an immersion blender or by hand, combine the squash, beans lemon peel, ricotta, toffuti sour cream and cream cheese. Add the bananas and eggs. Pre-heat oven to 160C (320 F). Spoon filling into filo lined pan. Top with toasted pine nuts. Bake for one hour. Allow to cool in the oven for at least an hour. Refrigerate.

Topping : 

Squeeze juice from the defrosted 2 cups frozen blueberries and cherries defrosted. Mix the syrup with the 1/2 cup dried blueberries/cranberries. Add enough hot water to make 1/2 cup of liquid. Mix in the Kuzo. (Be sure that it is a powdery consistency and not hard pieces.

Take cheesecake out of the refrigerator. Mix the fruits together and spread over the cake.

Instructions if you plan to freeze the cake: For a cheesecake with topping, such as fruit, always freeze cheesecake WITHOUT the topping and add the topping before serving.

You will have a nutritious desert for a crowd. This cake also lasts nicely in the fridge for a quick breakfast or a lunchbox meal. There is a slight amount of sugar in the dried cranberries and blueberries.


CHEESECAKE TIPS AND IDEAS From Diana’s Desserts

1) A springform pan (with removable side and bottom) is the most commonly used pan for making cheesecakes.

2) Avoid over-beating the batter. Over-beating incorporates additional air and tends to cause cracking on the surface of the cheesecake.

3) For even marbling and the best distribution of added ingredients, such as chocolate chips or nuts, do not over-soften or over-beat the cream cheese.

4) Avoid over-baking: Cheesecake baking times are not always exact, due to variations in ovens. The cheesecake will continue to bake after it is removed from the oven. The center of the cheesecake should be just slightly moist when it is ready to be removed.

5) Upon removal from the oven, loosen the cake from the edge of the pan by running the tip of a knife or narrow spatula between the top edge of the cake and the side of the pan. This allows the cake to pull away freely from the pan as it cools.

6) Cool the cheesecake on a wire rack away from drafts.

7) After a cheesecake has cooled completely, gently loosen the entire side of the cheesecake from the pan with the tip of a knife while slowly releasing the springform pan clamp. Carefully remove the side of the pan.

8) Baked cheesecakes freeze well. Cool them completely and wrap them securely in heavy-duty foil or plastic wrap, but do not freeze cheesecakes with garnishes or toppings.

8) If you are adding fruit (bananas etc. to substitute for sugar, leave it lumpy. Drain fruit we..or use the juice/fruit in a topping.

More Cheesecake Success Hints:

PREVENTING SURFACE CRACKS

The most common complaint is cracking that develops through the middle of the cheesecake during or after baking.

To Prevent Surface Cracking:

Bake the cheesecake in a water bath to keep the oven moisture high and the heat gentle. (A water bath is using a larger pan containing water in which to place the smaller cheesecake baking pan.)

Don’t overbake the cheesecake. When perfectly done, there will still be a two to three-inch wobbly spot in the middle of the cheesecake; the texture will smooth out as it cools.

Cheesecake will shrink as it cools. Generously greasing the sides of the baking pan before pouring in batter will allow the cake to pull away from the pan as it cools and shrinks instead of pulling apart from the middle.

Cheesecakes have a tendency to crack, but they don’t have to. This favorite American dessert can have a cracked surface for a number of reasons. One cause is air trapped inside the batter – a result of over-mixing. Once in the oven, the air bubble expands and wants to escape from the cake. As it finds its way out of the top of the cake, it creates a crack or crevice in the cake’s surface. Another cause of a cracked surface is a drastic temperature change.

How to avoid cracks then? Be sure to mix your cheesecake batter well, eliminating all possible lumps in the cream cheese BEFORE you add the eggs. It is the eggs that will hold air in the batter, so add them last, and mix as little as possible once they are in the mix.

Also, be sure to cook your cheesecake gently. Use a water bath – wrap the bottom of your springform pan in aluminum foil and place it in a larger pan with water in it, just halfway up the outside of the springform pan. This will allow the cheesecake to cook more slowly and evenly.

Finally, cook your cheesecake slowly – at 325º F. After about 45 minutes, turn your oven off and leave the cheesecake inside the turned off oven for another hour. Cool at room temperature with a plate or cookie sheet inverted over the cheesecake to slow the cooling. Only then can you refrigerate the cake, which you will need to do for another 6 hours at least.

If after all this, you still have a crack, make a topping or a sauce for your cheesecake, and tell all your guests that you intentionally made a special crack in the top of the cake to hold more sauce!

***VERY IMPORTANT TIPS ON PREVENTING CRACKING***

Cheesecakes with cornstarch or flour added to the batter do not crack as easily from overbaking. The starch molecules will actually get in between the egg proteins preventing them from over-coagulating. No over-coagulating, no cracks!! Some bakers add extra insurance to a cheesecake recipe that doesn’t contain cornstarch or flour, by simply adding 1 tablespoon to 1/4 cup of cornstarch to the batter with the sugar.

With today’s trend to produce larger and higher cheesecakes and to bake them without the benefit of a waterbath, they tend to overbake at the edge before the center of the cake has reached the temperature necessary to set (coagulate) the eggs. Here, your cheesecake will tend to form deep cracks upon cooling.

Don’t bake your cheesecake at too high a temperature (I recommend baking cheesecakes at 300-325 degrees F at the highest) The egg proteins will over coagulate from too much heat which eventually shrink when cooled, causing cracking usually in its center or tiny cracks all over its top. If you heat it up to fast or cool it down too fast you’re also going to get cracks.

Freezing Cheesecakes

Cheesecakes can be frozen. Careful wrapping is very important. To freeze, place a fully cooled cheesecake in the freezer, uncovered, for 1 hour. If it’s in a springform pan, remove sides of pan and freeze with the pan bottom in place. After 1 hour, use a knife to separate the cheesecake from the pan bottom. Slide it onto a foil-wrapped piece of heavy cardboard. Wrap in plastic wrap, then carefully place it inside a large freezer bag or wrap it in heavy duty aluminum foil. Label and date. Freezing for more than a month is not recommended to retain the best quality.

For a cheesecake with topping, such as fruit, always freeze cheesecake WITHOUT the topping and add the topping before serving.

Always thaw a cheesecake overnight in the refrigerator. When partially thawed, transfer it from the cardboard bottom to a serving plate.

” Water Bath ” For Baking Cheesecakes

A “water bath” is a method that will help keep your cheesecake from cracking while baking.

Instructions For Water Bath

First, take heavy aluminum foil, and wrap it around sides and bottom of your springform pan or cheesecake pan with removable bottom. This prevents leakage while baking your cheesecake.

Place your springform pan or cheesecake pan (filled with cheesecake batter and crust) into a larger deep baking pan* that it will fit into easily.

*Note: The larger pan should be at least 2-3 inches in depth.

Place in pre-heated oven. With a kettle filled with very hot water, pour water into the larger pan about halfway up, or approximately 1 1/2 to 2 inches.

Bake cheesecake as directed. When cheesecake is done, remove springform pan or cheesecake pan (if using) from “water bath” in oven. Carefully remove larger pan with water in it from oven. It will be very hot. Discard water when it has cooled.

Remove aluminum foil from sides and bottom of pan after your cheesecake has cooled completely in the refrigerator.

When you are ready to release sides of springform pan, or remove cheesecake from a cheesecake pan with removable bottom (if using) and cheesecake has cooled in refrigerator at least 4 hours or overnight; this is the best time to remove aluminum foil.

Creamy Cannellini Bean and Amaranth Soup: Macrobiotic (except for tomato ingredient)

Creamy Cannellini Bean and Amaranth Soup

Lori Sobelson

Cannellini beans are especially pleasing to the palate in the company of fresh herbs, and amaranth is a wonderful whole grain thickener that makes this hale-and-hearty soup plenty filling enough to be a main dish. For a super-thick and creamy soup, puree all of the soup rather than leaving half of the beans whole. I save up onion skin, carrot peelings, celery leaves for stock and keep it ready for “Soup Time”.

INGREDIENTS

2 Tbsp. extra virgin olive oil
2 large leeks, white parts only, sliced
3 garlic cloves, minced
1/2 cup amaranth
2 cups vegetable stock
1 bay leaf
1 tablespoon tomato paste
2 cups cooked cannellini beans, rinsed and drained, divided
1/2 cup chopped fresh basil
1 Tbsp. chopped fresh oregano
1 tsp. sea salt
Freshly ground black pepper

INSTRUCTIONS

1. Heat the olive oil in a large, heavy saucepan over medium heat. Add the leeks and cook, stirring frequently, until golden and soft, about 5 minutes. Add the garlic and cook for 1 more minute, then add the amaranth grains, stock, bay leaf, and tomato paste and bring to a boil.

2. Reduce heat to a simmer. Cover and cook for 30 minutes.

3. Remove the bay leaf from the amaranth mixture, add 1 cup of the beans, and use a handheld immersion blender to puree in the pot until smooth. (Alternatively, puree the beans in a food processor, add the amaranth mixture – working in batches if necessary – and puree again until smooth, then return to the pot.)

4. Stir in the remaining beans, the herbs, and the salt. Warm gently just to heat through. If desired, thin the soup with additional stock (heat before adding to avoid overcooking the soup). Season with additional salt and pepper to taste.

Recipe courtesy of Lori Sobelson, from the Bob’s Red Mill cookbook Whole & Healthy Grains for Every Meal of the Day.

Nutrition facts per serving:  Calories: 350 , Total Fat: 9 g, (Saturated Fat: 1.5 g), Sodium: 1290 mg, Carbohydrate: 57 g, Fiber: 12 g,  Protein: 15 g.

makes: 4 servings
serving size: 1 cup

Post 31: Cutting down on time in the kitchen so you can experience a Shabat outdoors with the Tzibur. Jen Hoy’s recipe for macrobiotic veggie burgers takes a bit of time, but the end result is well worth it. In a pinch, substitute organic canned beans for fresh cooked, and Try making these with a variety of chopped vegetables, and herbs, such as black bean with corn, or white bean with mushrooms and rosemary

Shavua Tov Kulam,

Many voices are yelling that Jerusalem needs a Pluralistic  Shabat.  http://www.timesofisrael.com/can-jerusalem-keep-all-its-residents-happy-on-shabbat/

Have you ever heard of someone walking away from a Shabat table and say to himself, “I just had dessert, sang Zmirot, and now I need to have a pluralistic Shabat tomorrow? ” Jerusalem is the only place in the world where Holiness is the order of business on Shabat.  Is Shabat about getting a cup of coffee?

I was at the Kabalat Shabat a week ago this past Friday night, November 7th, on the street along with about 150 people, mostly Dati men.  I understand that the scene was repeated this past Eruv Shabat and probably will continue. Were you there? The service was so full of light. There were not many women present. I was wearing a bright blue leather jacket and a granny square hat and vest. If you were there please write to me of your impressions of the Kabalat Shabat. Please send this blog on to anyone you saw. I would like to hear their impressions. Spread the word. I don’t think this show of unity will be in any of the newspapers.

 Maybe we will see more  Secular, New Age, Modern Orthodox, Reform, North Africans etc. in the future on the corner: a celestial Jerusalem for Kabbalat Shabat every Friday, shouting at the end with Rav Steiner, in jubilation, “Shabat”. This week we saw many Chassidum quietly davening Kabalat Shabat on the corner. You have to ask, “Why do they see the essence while others do not?”

So many Rabbis and representatives were present. Each gave the Tzibur center stage.

So my memories of this night as the nights of this past summer remind me of the wonders of the Jewish people.

After this summer’s stomach turning days and nights, Israeli Jews want a Shabat that sings out, that yearns for peace. 

In the big cities, we see offered attempts at more open, inclusive experiences.

Jerusalem is home to us. Every Israelis must feel that there is a place in Judaism that feels like home to him. Unfortunately, a restaurant and bar have become home to him. The people in the restaurant beyond the music just had a small taste of the unity of Shabat, and I don’t want it to be their last.

Did you join the y’gool with Naavah? We talked about the beauty of Shabat.

We all described the feeling that Shabat is our place. Shabat means preserving the sanctity of our lives and homes.

 Several representatives of the divided City Council were present. Naavah lives for the past 20 years in her apartment above the restaurant. She addressed her remarks to them. She and Odad Levinson, who lives with his family in the courtyard facing the corner restaurant, have invested their resources to bring the case to court, to try to reach a compromise with the restaurant and enforce the Shabat closure law or to some remnants of it.

Many other people in the y’gool complained that they called the city’s complaint number and also wrote complaints, Naavah has called 106 several times  a day over the course of months to complain about the loud music during the summer and crowding on the street and destruction of the peace of Shabat. I wrote a complaint to 106 and I think that we should continue to do so. I encourage you to include in your complaint that many people from the restaurant invade the space of the group that was praying by laughingly taking photos at their expense.

The police did not attempt to stop them. Instead, he police asked our little group to move, but we stayed seated.

I spoke with the restaurant owner and his cronies.

I believe there was a court decision which suggested a compromise. I have not seen the nitty – gritty the kishkes of the decision. It is the opinion of the restaurant owner think that he is permitted to set up tables on the street as far as he likes, up to the little button running down the middle of the midrachove.  Like the Marginous Line. He feels that the court vindicated his position as he has past all inspections. The owner pointed to the datim davening and he said, “They have their agenda and I have my agenda neged them”. “My restaurant patrons our quiet”.

He is admittedly against dati. The patrons want an “Open City” where they can have a variety of restaurants to visit on Shabat. When I raised the issue that the law forbids opening on Shabat he and others were adamant that the Mayor decides whether the law will be enforced. I asked the owner exactly how much profit he makes and could he run the business and also be closed on Shabat? He replied that he makes profit.  And he will be protected by  the police. (My comment).

They foolishly make Shabat very small, when it is the biggest part of our life. They make themselves small when they try to turn Shabat into a big joke.

 I engaged several patrons in conversation. I opened by remarking, “We both can agree on Freedom of Expression” pointing to the men praying. The fellow agreed wholeheartedly. Then I said, “When it comes down to dollars and cents, religion doesn’t matter.”

A young women in the group claimed to be a lawyer. She repeated that the mayor decides the policy and the restaurant is open and  OK.

Then I replied to the group of about 10 of the patrons. “My mother used to say that if you don’t want to smell don’t eat onions.” At that they all laughed. I was incensed by their brazenness. I said, “The Mayor and his agents are a bunch of ganovim. I pay my taxes to enforce the law. They are stealing from our tax money, putting salaries in their pockets and doing nothing”.  They didn’t reply.

It’s sickening. Before Olmhert was mayor, I heard that Druze police gave summonses to businesses open on Shabat. One patron volunteered that Orthodox Landlords  write into their leases that the business must be closed on Shabat, If that  stipulation is not in the lease, then the store may open on Shabat. The sad thing is that many frum Jews voted for Mayor Barkat. He doesn’t uphold the mandate to preserve the Shabat and he supports with tax money UNRAH Schools in East Jerusalem teaching hatred of Jews.

I want to see the Kabalat Shabat service repeated every week!  New Age, Secular, Orthodox, Reform, North African, Chareidim: a celestial Jerusalem for Kabbalat Shabat every Friday on Betzalel. And if we can have a camera set up before Shabat to run all Shabat, maybe we will identify the ones taking photos of the men praying? Or maybe just a pretend camera? Maybe people would not take photos not wanting to appear on a security camera? Would taking photos of men praying  be considered an infringement of religious freedoms?

They may own the stores, but they don’t own the airwaves. The beautiful Kabalat Shabat rang out and that was a Kiddush Hashem.

Many women recited tehilim and others linked arms. Maybe we will start a tehilim reciting group every Friday?

I invited a Venezuelan young woman who babysits for a family on Betzalel Street every Friday, Jo Shevah from Venezuela, to join us for Friday night dinner. She just happened to be at the corner after she left work.

We walked, dazzled to my home arm in arm.

JOIN THE EVENT: Outdoors every Friday celebrate Shabat on.Betzalel Street corner Trumpador. Get the continuing story at savyatseventy.wordpress.com on the scene to report to you every Sunday about Friday. Check the Follow box on the top of the blog. Please leave a message here if you will able to make up a sign for next week, or if you need hospitality to join the chevrah. Shalot Seudat on the street is also offered by a resident.

Shavua Tov,

Ida

Macrobiotic Veggie Burgers-to make in advance for your Shabat

This versatile recipe for macrobiotic veggie burgers takes a bit of time, but the end result is well worth it. In a pinch, substitute organic canned beans for fresh cooked, or sprouted chickpeas and be creative! Try making these with a variety of chopped vegetables, and herbs, such as blacks with corn, or white beans with mushrooms and rosemary

INGREDIENTS:

  • 1 tablespoon olive oil, plus additional for frying the burgers
  • 1 small sweet onion, chopped
  • 2 Tab. dried parsley
  • 2 Tab. cumin
  • 1 clove garlic, chopped
  • 1 carrot, chopped
  • 2 pinches of sea salt
  • 1 teaspoon chopped fresh thyme
  • 1 teaspoon chopped fresh oregano
  • 1/2 cup rolled oats
  • 2 cups drained, cooked black, red, or white beans, or chickpeas
  • 1 cup cooked brown rice, millet, amaranth or quinoa
  • Prep Time: 20 minutes
  • Cook Time: 10 minutes
  • Total Time: 30 minutes

PREPARATION

Heat oil in a sauté pan over medium flame. Add onion, garlic, and carrots and cook 7 minutes, until onions are translucent. Add the sea salt and herbs, cook one minute and remove from heat.

Place oats in a food processor and grind to a coarse powder or if you prefer leave them plain

Add cooked vegetables, beans, and rice quinoa and pulse until the mixture just holds together, but still has some texture. If the mixture seems very wet, add more oats (up to ¼ cup) until the mixture binds together and can be handled. I held the amaranth and quinoa out. then added to the pulsed chickpeas.

Form the vegetable-bean mixture into 4-6 patties

Cook the burgers over medium high heat until well-browned and crispy, about 4 minutes on each side.

Serves 4-6

Post 32: A Most Outstanding Winning Photograph, and My Favorite White Chocolate Cheesecake (inspired by Taste and Tell) White Chocolate Date Spread Cheesecake (Ricotta, Cream Cheese, Tofuti, Tofuti Sour Scream, with Macadamia Nuts and Vanilla Bourbon, Dried Blueberries, Cranberries and Nuts on Top. This cake will come out soft and barely hold together, but will chill and become velvety delicious. First time that I made a cheesecake with white chocolate chips. A jaw-droppper! Creamy white chocolate cheesecake has macadamia nuts, and date spread throughout with fruit

My blog has two parts and both have elements of sublime sweetness. The first is pure and the second is decadent.

“Chayla in Shul,” by Laura Pannack, winner of the National Portrait Gallery’s 2014 John Kobal Award. (Courtesy of Laura Pannack)


http://tabletmag.com/scroll/187025/portrait-of-orthodox-girl-in-synagogue-wins-international-photography-award.

Take a close-up look at the young girl in the photograph. The article also describes that the young girl is embarrassed that the photo is on display. Truly, she feels exposed without her consent. Laura Pannack’s work is a masterpiece.

And another favorite: Cheesecake (Ricotta, Cream Cheese, Tofuti, Tofuti Sour Scream, with Macadamia Nuts and Vanilla Bourbon, Dried Blueberries, Cranberries and Nuts on Top. This cake will come out soft and barely hold together, but will chill and become velvety delicious. First time that I made a cheesecake with white chocolate chips. A jaw-droppper!

Creamy white chocolate cheesecake has macadamia nuts, and date spread throughout with fruit

Ingredients

 Crust:

  • 1 cup oat cracker/ cracker (about 1/2  sleeve of crackers)

  • 2 tablespoons fruit syrup from vanilla bourbon soaked dried fruit

  • 4 tablespoons butter, melted or just use 1 teaspoon to spread over inside of pan and sprinkle crumbs

Cheesecake:

  • 4 oz white chocolate chips

  • 1/8 cup almond milk

  • 3 cups ricotta drained

  • 4 oz cream cheese

  • 3 oz tofuti cream cheese

  • 1 oz tofuti sour cream

  • ½ cup sugar substitute equivalent-2 Tab date spread

  • 3 eggs, at room temperature

  • 1 teaspoon vanilla extract

  • 1 cup roughly chopped macadamia nuts, plus more for topping if desired

  • 1 cup dried cranberries and blue berries soaked in bourbon vanilla

Instructions

    1. Preheat the toaster oven to 285F/140C. Your baking paper will be fine

    2. In a Cuisinart fitted with metal blade, crumble oats and crackers. Add fruit syrup  Add the butter and stir until all of the crumbs are moistened. Press into the bottom of a prepared with aluminum foil and paper 9-inch spring form pan and spread about half an inch up the sides. Bake in the toaster oven until lightly browned, 10-12 minutes. Remove and let cool.

    3. In a double boiler, or in a bowl placed over a pot of simmering water, combine the white chocolate chips  and almond milk. Cook, stirring frequently, until the chocolate is completely melted and smooth. Microwave high for 30 seconds also works. Almond milk turns the mixture to a caramel color. Set aside.

    4. In the bowl of a stand mixer, beat the ricotta  until it is smooth. Add the sugar/ date spread and mix to combine. Add in the eggs, one at a time, mixing and scraping the bowl in between additions. Add in the chocolate mixture and the vanilla/bourbon fruit  mixture and mix just until combined. (Make sure you scrape the bottom of the mixer with a spatula to make sure all of the ingredients are combined. I always find some of the cream cheese sticks in the bottom of my mixer bowl.) Stir in the 1 cup of macadamia nuts, leaving1/3 cup to sprinkle on top Pour the mixture into the crust. Top with remaining nuts and soaked dried blueberries/cranberries.

    5. Raise temperature before to 325 F (176C). Bake the cheesecake until the outside is mostly set and the middle just barely jiggles when you shake the pan, about 1 hour. Turn off the heat and prop the oven door open with a pot holder or kitchen towel. Let the cheesecake cool completely in the oven, then remove, cover and refrigerate until chilled thoroughly, preferably overnight.

    6. To serve the cheesecake, run a knife around the outside of the pan. Carefully remove the outer edge of the spring form pan, and place the cheesecake on a serving plate.

    7. Store the cheesecake covered in the refrigerator.

Post 30: A Funny Y’Gool Story; Kipot Barzel from Y’gool Shop for Ladies- From Wholly Macro – Kayu Rice Bread Recipe

This post is about covering the soft and “round” (Y’gool) parts of the torso and  Kayu Rice Bread, which is a soft bread. Y’GOOL is the name of an “accessory” store on Rechove Agrippas opposite Binyan Klal.
The owner of the shop, Kalina, from Argentina,  is very proud of her enterprise which she opened in 1984 exactly thirty years ago as a bright eyed university graduate. Every time I visit the shop I am greeted by a mature Russian saleslady and several young women.

Kalina shared with me the source of her youth sales “staff”.  The young  women in her training program are referred to her by Elwyn Israel. Elwin offers vocational-rehabilitation services  in Jerusalem and the region to afford each individual the opportunity to integrate into a suitable vocational program or to advance according to his/her desires, needs and abilities. She teaches them display, and sales techniques. They keep the business humming and have the dignity of a job.

Executive Offices Elwyn Israel

20 Henrietta Szold St., 96502 Jerusalem,
Israel

Tel: 972-2-641-5448
Fax: 972-2-643-0495
E-mail: info@israelelwyn.org.il

It seems that without the stimulus she would not be able to turn a profit. The government pays the worker’s  insurance (Bituach Leumi), and Kalina pays a  wage per hour permissible below the minimum wage. The workers work 9-7PM and eruv Shabat 9-3. It’s a win-win situation for for ownber and worker.
 The walls of the shop are covered with scarves, hats, hosiery, socks,  etc. Kalina asked me, with one hand raised to her head,  “Why  is the shop called Y’GOOL?”  The same hand slowly moved over her shoulders and progressed caressingly lower and lower. I caught on…..It was like an SAT question. Think in terms of volume or 3 dimensions.
I shook my head nodding that I  got the picture.  Do you? (It’s not about  exactly because there are items of underwear in the shop too.)


RICE KAYU BREAD : https://mbasic.facebook.com/notes/

This delicious bread recipe is derived from the head chef (and excellent one at that) at the Kushi Institute. Kayu means soft rice in Japanese. This is a fairly simple soft rice bread recipe that has many flavorful and nutritious advantages over store bought bread.

1- You can make it fresh at home.

2- It uses bona fide whole grain rice (or other grains), not just flour. The rice (or other grains) are fermented first, similar to sourdough, which gives the bread the ability to rise without the use of yeast, and also creates healthy probiotics for your digestive system at the same time.

3-It can be steamed or baked. You can try it both ways. Steaming is the traditional method and is usually easier on digestion and the preferable way to eat bread. Either way it is truly a whole grain experience, offering much more energy and vitality to the body than breads made from flour only. It is a great travel food too! On an airplane trip and it is like manna from heaven in the desert of the airport world, substantial, filling, and nourishing. Enjoy!

INGREDIENTS

2 Cups soft rice or any combination of cooked grains, freshly prepared or leftovers.

or 2 Cups barley seed, soaked overnight and  brought to boil, reduce flame to low, for 25 minutes in the pressure cooker  (recipe) and then soaked again.

3 cups flour – can be any combination of whole wheat, whole-wheat pastry, spelt, or unbleached white – we prefer 1.5 cups whole wheat and 1.5 cups whole-wheat pastry.

I used whole wheat, rye, and buckwheat.

1-teaspoon barley miso

2 teaspoons sesame or olive oil (for oiling the pan)

You can also add nuts, seeds, dry fruit, or olives if you like. I used chopped pecans

INSTRUCTIONS

Oil a 9 X5X3 inch deep glass, metal or Pyrex loaf pan and set aside.

Mix the miso into the grains and let sit / ferment overnight, or for about 12 hours, in a warm (90-100 degree) place such as the oven with the light on for warmth overnight covered with wet towel and bowl of water .

When the oven gets warm because of the light, turn off the light.  Do this before you go to sleep. The oven  will stay warm until morning.  No mold- yessssss!!!!! (method thanks to friend Beverly Legget of Macrolovers Jerusalem. My dough only bubbled slightly).

Once the grains are fermenting (bubbling and smelling like sourdough), combine the flour and grain in a mixing bowl and gather together to form a ball, mixing thoroughly.

Let the dough rest for 10 minutes.

Moisten your hands with water to prevent the dough from sticking, and knead the dough well, introducing air into the dough and encouraging the gluten to toughen. Add nuts, seeds, etc. at this stage if desired. I added cup of chopped pecans.

 Let the dough rest for another 10 minutes (or longer).

Repeat the kneading and resting four or five times. On the last two kneadings, I used the food processor fitted with a metal blade. I divided the dough into half and then into thirds and processed each half by spreading the dough around the outside of the processor. The dough was kneaded into two balls.

On last knead, press the dough into the loaf pan and let it rise / ferment in a warm humid place for 6 – 12 hours overnight depending on the conditions. I used the 2 setting on the turbo oven of the La Cucina oven. You can cover it with a moist warm towel, or place it in a covered pot with water to create humidity. Do not let it dry out. The dough should expand by 1/3 of its size. I removed the towel and moistened it again with hot water. When I laid the towel on the loaf I was careful to lay a screen over the loaf and then the towel.

To steam: set a steamer basket in a pot with water under it and bring to a boil. Lower the heat to medium and place the loaf pan with the risen dough in the steamer. Cover and steam for 1.5 hours, being sure that the water does not boil away. Do not open the pot during the first half hour of steaming.

Remove from steamer and let it cool completely before using.

To bake: bake in a pre-heated oven at 225 degrees (107 C) for 30 minutes, and then raise temperature to 350 degrees (177 C) and continue baking for an additional 45 minutes. Remove from oven and let cool completely before using. the bread will freezes well.

Yield: 2 loaves / approximately 20 slices


Post 29: An example of Helping others – http://www.jr.co.il/articles/the-train-ride-that-i-will-never-forget.htm Macrobiotic in Vancouver-Rice combo with cook lentils http://akomacrobi.at.webry.info/200910/article_14.html

This is a blog about chizuk for the soul and nourishment for the goof (body). The recipe for rice and lentils is very simple and any novice in the kitchen can handle it. The ratio is about 2:2:1 vegetables:grain:protein.

The author requested that his story be told.

 The Train Ride that I will Never Forget

by Jacob Richman

      November 5, 2014
      Hi Everyone!

Tonight, I paid a visit to a friend recovering from surgery in Shaarei Tzedek Hospital in Jerusalem. His recovery is going well and tomorrow they may let him go home.

I left the hospital after 9:30 pm and walked over to the light rail station opposite Yad Sarah. As is my habit from riding the subways in Brooklyn (coming home from school), I entered the very beginning of the train. After so many years, I still like watching the engineer drive the train. When I got on, the train was half empty and I took a front row seat.

I was about to have the privilege to see something totally amazing. An “Only in Israel” episode.

Near the front side door of the train (where I walked in) was a guy wearing a train security jacket and he had two very large tea thermoses on the floor and two open packages of hotcups tucked into a space near the top of a holding pole. As the train entered a station, he would wave to the security personnel on the platform to go to the beginning of the platform. When the doors opened, he would quickly pour them a hot cup of tea. If the security guard could not get to the front door in time, he would hold the door for a few seconds or if there were several security guards, he would quickly pour several cups and place them on the platform right outside the train door. Once or twice he stepped out of the train and whistled to get the attention of the security guards.

At one of the stops, the train engineer opened his secure door and turned around a bit and tried to argue with the security guy that he was breaking train procedures. The security guard told him that he is doing his job (or something like that) and that he will not cause any schedule delays.

I spoke to the security guy and found out he does this every night. I said to him (and others near us) that in the 30 years I have been in Israel, I was in awe by such a good thing he was doing. He did not say anything, maybe just a smile. I did not take pictures or ask for his name.

When we approached a stop in Gelua (one before the terrorist attack platform) an older Hasid (by the way he was dressed maybe be a Rebbe) that sat across from me was getting up to leave the train. He looked at me and smiled and I think we both nodded at each other at the same time. He knew what we had witnessed was something very, very special.

The platform at the next stop on the train was full of soldiers and security personnel. It was the stop where the terrorist killed an Israeli Druze Border Patrol Chief Inspector. His name was Jadan Assad, 38, from the Druze village of Beit J’an in northern Israel. He leaves behind his pregnant wife and a three-year old child. I never met Jadan, but he was also someone very special. May he rest in peace.

Before I got off the train at Ammunition Hill, I shook the security person’s hand and thanked him. I do not think that the night time train, hot tea run was part of his job. In fact, his conversation with the train engineer seems to confirm that it was not.

I think he knew most of the train security personnel and during the ride two ticket inspectors boarded the train and he knew them also and poured them some hot tea. My guess is that he quickly poured dozens of cups of hot tea at that late hour. I offered him my seat during the ride but he declined and he was constantly on the lookout for security personnel on the train platforms. He gave warmth to many people on the train platforms tonight. He gave me a train ride I will never forget.

Lately, with all the sad news that we hear and all the problems each one of us may have, it is inspiring to see how just one single security guard on a late night train ride can change the world.

      I saw it tonight and had to tell others.
      Am Yisrael Chai!
      Have a good night,
    Jacob Richman


Image

Rice combo with cook lentils

Ingredients

1-Brown rice 1.5 cup
2-Green lentils 1/2 cup
3-Tempe 1/4 cup-prepared to your liking.
4-Maitake Mushrooms 1/2 pack
celery chopped 1/4 cup
onion chopped 1/4 cup
carrots chopped 1/4 cup

kelp in vegetable broth 3 cups

salt 1/4 teaspoon

soy sauce 1 teaspoon or miso

Instructions

1 and 2 bring to boil with broth and add soy sauce.

Lower flame and after 40 minutes of simmering, add vegetables. etc,  to the top. Cover and steaming  3.15 minutes.

Enjoy-My version may be different from the Japanese as the translation to English was gobbledygook.

Post 28: Carrying over the circle (Y’Gool) theme from last blog Beets in a Ball; Aish Tanoor ( Round Flaky Bread) and a Simple Beet Soup Borsht Recipe

In this blog I’ll be continuing the circle (Y’Gool) theme from blog Beets in a Ball. This photo was meant to capture the sun (circle) shinning in our indoor sitting area. During  sunny winter afternoons it can be blustering and sunny outside. I can filter in the warm rays.

Three weeks ago, from this coming IMG_20140824_070606Wednesday I entered the shuk for my typical shopping day. The scene was not typical. The customers seemed out numbered by the masses of army personnel being escorted around the narrow lanes. They were fanning out like the lengthy extensions of a train-line never more than two across. Since then (Mid October-the police presence in populated areas has been palpable and welcomed.

A crusty bread (round) made in an  Aish Tanoor (fire oven)  that we like is from Chabas, a bistro and bakery on Yaffa Street. JUST IMAGINE it  AS it is not posted. This bread is baked in a special oven in Chabas Bakery on Agrippas Street. It is available only on order and it has a shelf life of 5 months because it is so dry. Do you know a bread with a shelf life of 5 months that does not contain preservatives? The bread is wafer thin. The baker said once we try it we’ll want more.

Beet Soup from: http://allrecipes.com/recipe/beet-soup/

I have made changes, omitting the cream

  • Ingredients

    3 tablespoons olive oil

  • 1 medium onion, chopped

  • 3 cloves garlic, chopped

  • 6 medium beets, peeled and chopped

  • 2 cups beef stock

  • salt and freshly ground pepper

    Directions

  • Warm olive oil in a large saucepan over medium heat. Stir in onions and garlic; cook until soft but not browned, about 5 minutes.
  • Stir in beets, and cook for 1 minutes.
  • Stir in stock, and season with salt and pepper. Bring to a boil; cover, and simmer until the beets are tender, about 20 to 30 minutes. Remove from heat, and allow to cool slightly.In batches, add soup to a food processor, and pulse until liquefied. Return soup to saucepan, and gently heat through.
  • Ladle into bowls.

Post 27: Sukot: NOT A SUITABLE CANDIDATE… Chasam Sofer, Two Tempeh dishes, one with Tahini, one with coconut – east meets Middle East-Ketchup from your homemade tomato paste

NOT A SUITABLE CANDIDATE….I meant to post this back during Sukot. I requested permission from Yated Newspaper to use the story. However there was no reply. All other sources approve with citation.

A bochur (student in yeshivah) once applied to the Chasam Sofer’s yeshiva, asking to be accepted for the winter zeman (term). It was shortly before Sukkos, and the yard was filled with sukkah boards. The bochur was tested, and did very well. The Chasam Sofer watched him leave, and then decided not to accept him.

When asked about his decision, the Chasam Sofer explained, “I watched how the bochur carelessly stepped on the sukkah boards. One may not step on these boards, as they are Tashmishei (used) for the Mitzvah. A bochur who is not careful with the kovod of sukkah does not belong in the yeshiva.”

All things require respect: So much more so is respect central to our relationships:

Tempeh with Tahini

Total servings: 6

Recipe ingredients

 1 red bell pepper, deseeded, cut in small pieces

 2 onions, chopped

 2 Tsp oil

 200 g tempeh, cut in small cubes

 2 cups vegetable stock

 2 Tbs white miso

 1 tsp soy sauce

 1 Tbs vinegar

 5 Tbs tahini

 1 scallion, chopped

Recipe directions

Saute onions and pepper in the oil in a skillet. Add the vegetable stock, miso, and tempeh and simmer for 40 minutes. Remove skillet from heat.

Mix vinegar, soy sauce and tahini (tahini is a paste made from sesame seeds). Add this mixture to the skillet.

Garnish the Tempeh with Tahini with scallions. Serve hot with rice.

Panko & Coconut Crusted Tempeh with Caramelized Onions, Sweet Potato & Kale

I’ve made this dish a couple of times and I love it! It’s definitely comfort food and maybe not for summer but who cares. Tempeh is a fermented soy product loaded with protein. Some people are intimidated by this food because if not prepared properly can be bitter, so steaming is crucial. Many meat eaters assume that being vegan means eating boring foods well not true. In fact I’ve learned no much more about foods since eliminating meat and dairy and finding satisfying alternatives. Even if you are not vegan you will be sure to love this dish – good food is good food, plain and simple.

You will notice I use raw coconut oil in most of my dishes because it doesn’t turn rancid in heat and maintains it’s nutrients – I also don’t think it overpowers my dish. Feel free to substitute but nutrition is my goal here.

Ingredients:

One package Tempeh

2 small sweet potatoes

1 bunch Kale

1 large white sweet onion

panko – simply means flaky bread crumbs-see our recipe Post 25

unsweetened shredded coconut

coconut milk or almond/rice milk

coconut oil

flour – I used whole wheat but I will try Spelt next time.

Marinade for Tempeh

1 tbsp Shoyu or Tamari/ white miso

1 garlic clove minced

2 inches fresh ginger grated and juice squeezed

juice of ½ lime

1 tsp toasted sesame oil

t tbsp rice vinegar

pinch of red pepper flakes

½ tsp Umeboshi Paste – optional

Combine all the ingredients for marinade in wide bowl or plate.

Tempeh

  1. Remove tempeh carefully from package and cut it in half so you have two rectangles. Using a medium pot steam the tempeh for 20 minutes covered – this removes the bitterness tempeh is known to have and allows for more absorption of the marinade.
  1. Remove the tempeh from pot and quickly add to the marinade. Turn over about 6 times in a row until most of the marinade is absorbed – an hour of marinating time is sufficient.

Crust for Tempeh-Use  My Homemade Panko Crumbs (Post 25) made from whole grains and bake

Add Panko Crumbs to a  plate, and a wide bowl for the coconut milk and another plate  for the combined panko and shredded coconut . Coat the marinated tempeh on both sides with the flour, then dip both sides in the coconut milk and then in the coconut panko. Set on a plate and repeat the step with the other piece.

Bake on bottom of oven on lined paper tray – crusted tempeh on both sides in 1 tbsp coconut oil. Bake until golden and flip.

Directions for Caramelized Onions

Large onion thinly sliced

1 tsp coconut oil added to skillet

Sauté in large skillet over medium heat until golden brown, not burnt

When done set aside until ready to plate

Sweet Potato

Wash and peel potato, cut into 1 inch cubes– boil until fork tender when ready mash and add sea salt and pepper

Sauted Kale

1. Wash kale, remove stems and tear into pieces.

2. In large skillet add 2 tsp coconut oil and one clove minced garlic sauté for 30 seconds and quickly add the kale with a pinch of sea salt. Mix well and remove just as it begins to wilt.

Plating the Food

To each plate add heaping portion of kale, followed by mashed sweet potatoes, then the caramelized onions and topped with tempeh

Enjoy!!! from Flipflopsandavocados.com

Lastly:

Homemade Ketchup

white vinegar is gluten usually, so I would put in lemon juice or apple cider vinegar]
  • 5 lbs. very ripe tomatoes – use pressure cooker paste from Post 25 to get 1 lb. paste
  • 1/2 c. white vinegar/lemon juice or apple cider vinegar 
  • 1 tbsp. salt
  • 1/4 c. sugar ( 1/4tsp. of Stevia)
  • 2 cloves garlic
  • 1/2 c. onion
  • 1 tbsp. black peppercorns
  • 1/4 tsp. ground allspice
  • 1/4 tsp. cinnamon
  • 1/4 tsp. cayenne pepper
  • 1/2 tsp. ground ginger
  • 1/2 tsp. garlic powder
  • 6 cloves
  1. Use 1 lb. of homemade tomato paste.
  2. Add half the vinegar and a few pinches of the salt and bring the mixture to a boil.
  3. Cook for 5 minutes, mashing with a wooden spoon.
  4. Strain the liquid into a saucepan without pressing on the solids (this may be obvious to others, but was not to me…use a very fine wire strainer-not a colander).
  5. Press the solids into another saucepan by forcing them through the strainer, leaving the seeds and skins behind. Rinse the strainer.
  6. Stir in the sugar substitute into the solids.
  7. Add all the remaining ingredients to the liquid.
  8. Bring the liquid to a simmer and cook for about 20 minutes, until very syrupy.
  9. Strain into the solids, and bring to a simmer, stirring well. Simmer for 5 more minutes or until the desired consistency is reached. (it took about an hour of simmering for it to be as thick as I wanted) Puree with a hand blender, food processor or blender if necessary.
  10. Taste and adjust the seasonings. The mixture should be sweet and faintly tangy; if more tanginess is needed, sprinkle in some vinegar or tamarind paste.

Post 26: http://en.wikipedia.org/wiki/Listerine – Is Listerine Safe for everyday use? Making your own tomato sauce from your bumper crop – http://www.practicallyedible.com/pressure-cooker-pasta-sauce Pressure Cooker Pasta Sauce WITHOUT salt and good for Diabetics and those whose salt intake is limited

How many of us have been using Listerine? I was instructed after oral surgery to use it topically on the surgical area, temporarily. Now, I have a few questions to ask my dentist about whether Listerine (containing Alcohol) may increase the risk of developing oral cancer.

Wikipedia:

There has been concern that the use of alcohol-containing mouthwash such as Listerine may increase the risk of developing oral cancer. 1 Studies conducted in 1985,3 1995, 4 and 2003 5 summarize that alcohol-containing mouth rinses are not associated with oral cancer. However, a review of a study carried out in Cuba, Argentina, and Brazil published December 2008 in the Australian Dental Journal concluded that:

There is now sufficient evidence to accept the proposition that developing oral cancer is increased or contributed to by the use of alcohol-containing mouthwashes. Whilst many of these products may have been shown to be effective in penetrating oral microbial biofilms in vitro and reducing oral bacterial load, it would be wise to restrict their use to short-term therapeutic situations if needed. Perhaps the use of mouthwashes that do not contain alcohol may be equally effective. Further, mouth rinses should be prescribed by dentists, like any other medication. There may well be a reason for the use of alcohol-containing mouth rinses, but only for a particular situation and for a limited and controlled period of time. As such, patients should be provided with written instructions for mouthwash use, and mouthwash use should be restricted to adults for short durations and specific, clearly defined reasons. It is the opinion of the authors that, in light of the evidence available of the association of alcohol-containing mouthwashes with the development of oral cancer, it would be inadvisable for oral healthcare professionals to recommend the long-term use of alcohol-containing mouthwashes.6

In January 2009, Andrew Penman, chief executive of The Cancer Council New South Wales, called for further research on the matter.6 In a March 2009 brief, the American Dental Association said “the available evidence does not support a connection between oral cancer and alcohol-containing mouth rinse”. 7

In 2009, Johnson and Johnson launched a new alcohol-free version of the product called Listerine Zero. 8

On April 11, 2007, McNeil-PPC disclosed that there were potentially contaminants in all Listerine Agent Cool Blue products sold since its launch in 2006, and that all bottles were being recalled. 9 The recall affected some 4,000,000 bottles sold since that time. 10  According to the company, Listerine Agent Cool Blue is the only product affected by the safety issue and no other products in the Listerine family were under recall. 9

Listerine (From http://www.marksdailyapple.com/primal-paleo-soda-water-listerine-tamarind-chicory-cherimoya/#axzz3HzHt0h00)

As much as people in the Primal health community tend to shy away from questionable conventional medical advice, Listerine appears to be a truly effective product. It has no fluoride (unless you buy the one with fluoride in it). It actually seems to be quite “natural,” containing some ethanol, or alcohol, plus a bunch of essential oils from a variety of medicinal plants and herbs, including thyme, wintergreen, eucalyptus, and peppermint. If you ignore the plastic bottle, child-safe lid, possible synthetic sources of said oils, and ubiquitous marketing, Listerine looks, tastes, and smells an awful lot like something a shaman would cook up in the Amazon somewhere.

Does it work? You can use Listerine, just change the sequence.

According to one dentist who promotes both good nutrition, stress reduction, and modern dental interventions, Listerine can be part of an effective oral hygiene regimen but it should not be used as a final rinse because the acidity can dry out the mouth and cause the protective pellicle layer to wither away. If you’re going to use Listerine, sandwich it in between brushing and a final rinse of something more amenable to oral moisture retention. For what it’s worth Dr. Ellie Phillips supports the use of fluoride mouth rinses for this purpose, but not the consumption of fluoridated drinking water. http://drecoaching.com/blog/2013/03/27/the-fluoride-debate-two-sides-to-every-story/

Links between Listerine usage and oral cancer

(if they’re causally related) can probably be attributed to users’ tendencies to use the mouthwash as a final – and thus acidic, drying, lingering – rinse.

As a standalone intervention, however, Listerine has mixed evidence. Some studies indicate that Listerine eradicates all oral bacteria within 30 seconds of swishing and can even be used to disinfect toothbrushes (although one study found that it was just as effective against the streptococcus mutans species as air drying). Seeing as how oral bacteria both contributes to and protects against dental disease depending on the composition of the oral ecology, wiping them all out with Listerine may have unwanted effects.

Verdict: Primal, if used properly as described in the links from Dr. Ellie Phillips above (tooth decay is not Primal). Not Primal, if used incorrectly and haphazardly.

Read more: http://www.marksdailyapple.com/primal-paleo-soda-water-listerine-tamarind-chicory-cherimoya/#ixzz3Hzd7N4Hl

  1. McCullough, Michael; C. S. Farah (December 2008).“The role of alcohol in oral carcinogenesis with particular reference to alcohol-containing mouthwashes”. Australian Dental Journal 53 (4): 302–305. doi:10.1111/j.1834-7819.2008.00070.x. PMID 19133944. Retrieved 2009-01-12.
  2. Jump up^ “Mouthwash linked to cancer”. Retrieved 2013-04-24.
  3. Jump up^ Mashberg A, Barsa P, Grossman ML (May 1985). “A study of the relationship between mouthwash use and oral and pharyngeal cancer”. J Am Dent Assoc 110 (5): 731–4.PMID 3859544.
  4. Jump up^ Elmore JG, Horwitz RI (September 1995). “Oral cancer and mouthwash use: evaluation of the epidemiologic evidence”. Otolaryngol Head Neck Surg 113 (3): 253–61.doi:10.1016/S0194-5998(95)70114-1. PMID 7675486.
  5. Jump up^ Cole P, Rodu B, Mathisen A (1 August 2003). “Alcohol-containing mouthwash and oropharyngeal cancer: a review of the epidemiology”. J Am Dent Assoc 134 (8): 1079–87.doi:10.14219/jada.archive.2003.0322. PMID 12956348.
  6. Jump up^ Weaver, Clair (January 11, 2009). “Mouthwash linked to cancer”. The Daily Telegraph. Retrieved 12 January 2009.
  7. Jump up^ Science brief on alcohol-containing mouthrinses and oral cancer, American Dental Association, March 2009
  8. Jump up^ Listerine cancer claim triggers court battle, The Guardian, 27 August 2011
  9. ^ Jump up to:a b “McNeil-PPC, Inc. today issues voluntary nationwide consumer recall of Listerine Agent Cool Blue plaque-detecting rinse products” (Press release). McNeil-PPC. 2007-04-11. Retrieved 2014-04-10.
  10. Jump up^ “Contamination prompts J&J recall of Listerine Agent Cool Blue plaque-detecting rinse”. NBC News. Associated Press. 2007-04-12. Retrieved Aug 15, 2014.


Is it practical / feasible to make a pasta sauce / spaghetti sauce / tomato sauce in a pressure cooker?

We in Israel are experiencing a Shmitta year.

Instructions: This turns fresh tomato purée into a very thick tomato sauce with no tomato paste needed, nor any stirring needed once the cooking has begun. Wash the tomatoes, quarter them (no need to peel or seed, but do so if that is your preference), process through food processor. You will end up with a thick purée / juice.(Note: Cooking times WILL vary based on the variety of tomato being used. If you are using tomatoes really meant to be more juicy, fresh-eating type tomatoes as opposed to sauce tomatoes which are naturally less watery, then you may need to double cooking times below.)Bring this purée to a rolling boil in the pressure cooker, with no oil, tomato paste, etc, added, stirring with a wooden spoon until you can’t break the boil anymore, then put the lid on, seal it, bring to pressure, and set on low pressure. Here are the cooking times under pressure:4 cups (32 oz / .95 litres) of purée: 30 minutes
8 cups (64 oz / 1.9 litres) of purée: 40 minutes16 cups (128 oz / 3.8 litres) of purée: 60 minutes
24 cups (192 oz / 5.7 litres) of purée: 85 minutesAt the end, let pressure release naturally.If it is still runnier than you wanted, bring back up to pressure and cook some more — all things being equal, say, 15 to 20 minute intervals.Yield: exactly one half the volume you started with.

WHY THIS IS BETTER THAN THE OPEN POT METHOD

I have done for years the traditional method of making tomato sauce — hot stove in humid August stirring huge cauldrons, morning hours stretching into afternoon hours into evening hours, wondering how many rockets to the moon the cooking fuel being used could have powered. I would now never do it that way again.

It is not only faster and more cooking-fuel efficient to do it in a pressure cooker, but the taste of the resulting tomato sauce is also brighter, fresher, and more concentrated.

And the bonus is: you don’t have to stand there and stir! Set it and forget it! (Well, it’s a pressure cooker, so obviously you will stay well within ear / eye shot of it during operation, but you know what I mean.) It’s a sealed pot, so once it is underway there is nothing you can stir. Darn, eh?

THE NITTY GRITTY FOLLOWS, FOR THOSE INTERESTED

I’m going to give you my experiment step by step so that you will understand how the cooking time affects the thickness of tomato sauce in a pressure cooker. I’m also going to provide photos so that you can see how the sauce shapes up after different periods of time.

My pressure cooker is a Nutricook™. I used the veg setting on it; that is a low pressure setting of around 40 kPa (5.8 Psi).

Also, I am not one for skinning and seeding tomatoes. If you are, you can do that; I know a lot of Italian grannies may faint otherwise. I don’t mind tomato seeds in a tomato sauce, and a blender or food processor grinds up the skin finely enough for me. Plus, so many vitamins are in the tomato skin. Like I say, more power to you if you want to go to that extra work.

I began by puréeing the tomatoes in a blender, but it’s a pain: they get stuck and you have to remove the jug, jiggle it so they will fall down more and hit the blade, etc. When I switched to a food processor for the tomatoes, the work went much faster and it did just as good a job.

GETTING STARTED WITH THE PRESSURE COOKER TOMATO SAUCE

pressure-cooker-pasta-sauce

Above, you see the initial starting setup. Switching to a food processor,  made the process go much faster.

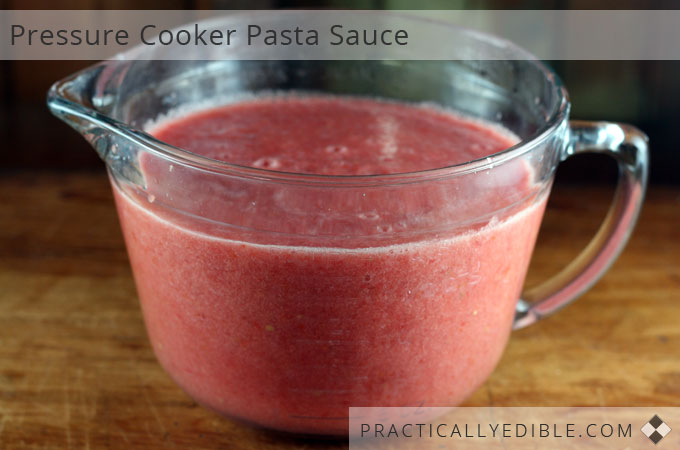
Initial test with 8 cups (2 US quarts / 64 oz /  gave 1.9 litres) of tomato purée.

pressure-cooker-pasta-sauce

There above is what the puréed sauce looked like, fresh out of the food processor, and ready to start cooking with. Bring the raw tomato sauce to a good rolling boil, stirring frequently with a non-reactive, wooden spoon (habit from times past when dealing with tomatoes) as the boiling started. When the boiling got so vigorous that it is frothing put the lid on and sealed it.

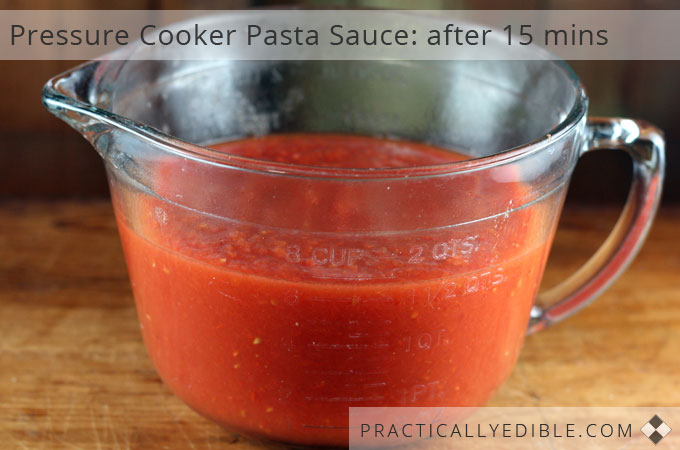
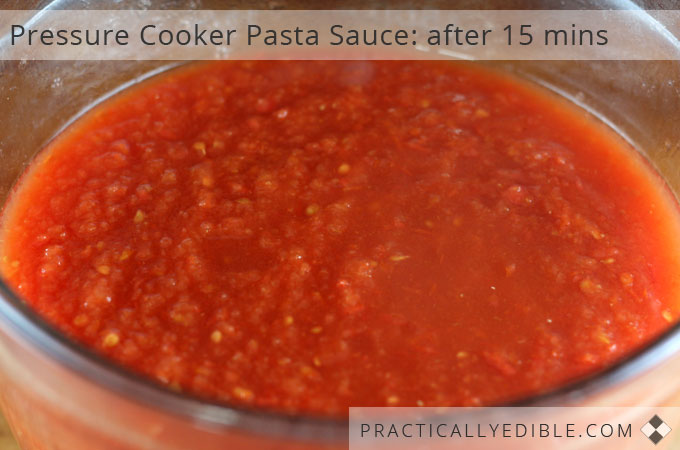
First cooking for 15 minutes, on the veg setting on the Nutricook (lowest pressure.)AFTER 15 MINUTES OF COOKING TIME

pressure-cooker-pasta-sauce

After 15 minutes, the starting volume of 8 cups / 64 oz / 1.9 litres has reduced to: 6 3/4 cups / 54 oz / 1.6 litres.

That’s a reduction of 15 % from the initial raw purée (1.9 litres to 1.6 litres = 300 ml).

pressure-cooker-pasta-sauce

There it is above. It’s something that I’d term “fully cooked tomato juice.” It’s ready to be bottled or frozen as processed tomato juice, to be used in a soup, or as a juice, or simmered down further in an open pot into a thick sauce with the addition of tomato paste, flavourings, onion, peppers, mushrooms, etc.

But our goal is to see if we can avoid the whole simmering cauldron scenario to make it a thick sauce. The added bonus is that reduced volume requires less space in the already over-crowded deep freezer. So onward.

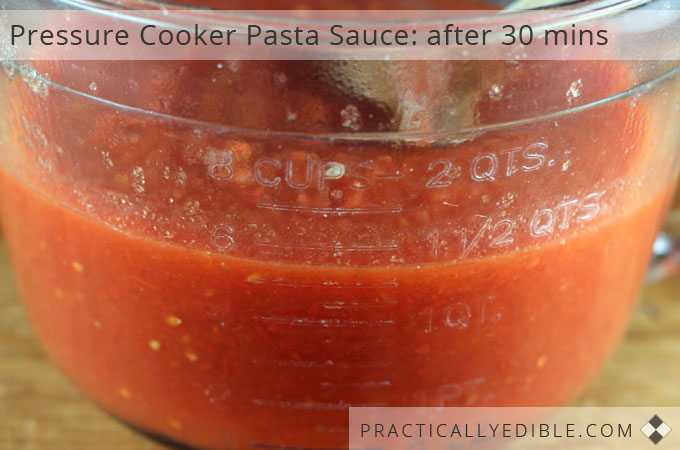
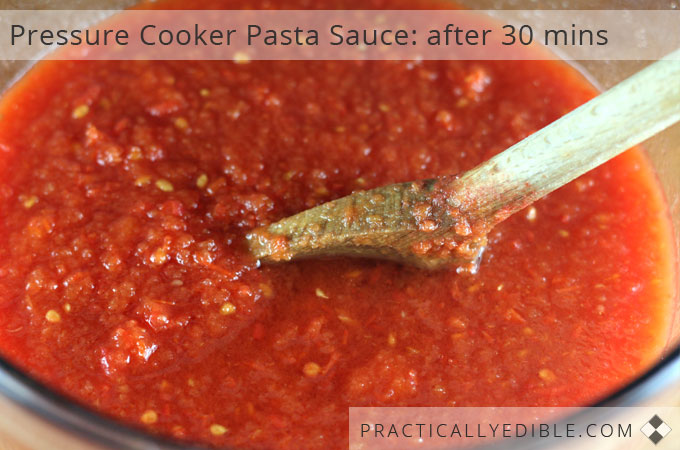
AFTER 30 MINUTES OF COOKING TIME

After 30 minutes of cooking time

After a total of 30 minutes, the volume has reduced to: 5 1/2 cups / 44 oz / 1.3 litres.

That’s a reduction of 30 % from the initial raw purée (1.9 litres to 1.3 litres = 600 ml).

Pressure Cooker Pasta Sauce after 30 mins

There it is above. It is thick enough to pass for most homemade pasta sauce uses, quite nice.

It’s like a nice fresh-made sauce, what an Italian might call a “sugo”, with no need for tomato paste in it for that semi-thick texture typical of a quick, homemade “sugo” (sauce.)

However, I’d like to see if a small amount more of cooking will thicken it even further. If it takes hours more of pressure cooking to thicken it significantly more, forget it. But if a few minutes more can make a difference, I’d like to know.

So I’m going to give it another 10 minutes.

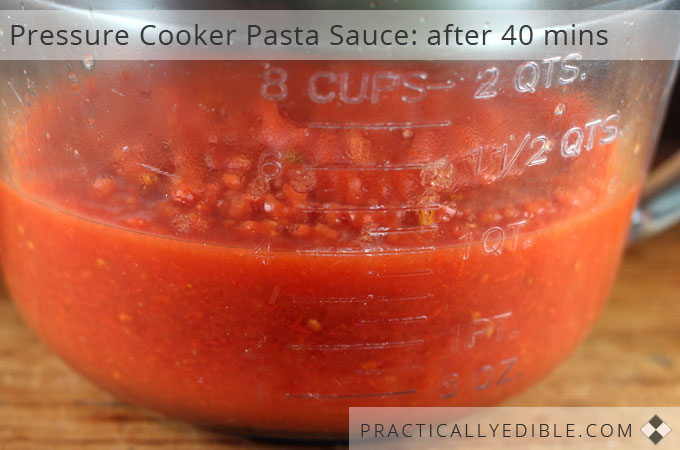
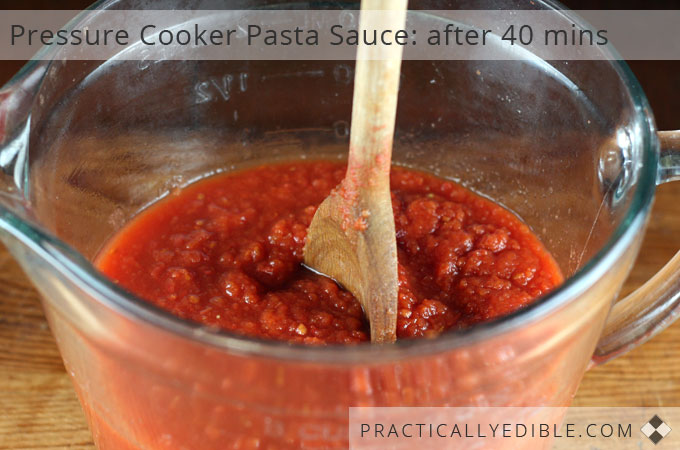
AFTER 40 MINUTES OF COOKING TIME

Pressure Cooker Pasta Sauce after 40 mins

After a total of 40 minutes, the volume has reduced to: 4 cups / 32 oz / 950 ml.

That’s a reduction of 50 % from the initial raw purée (1.9 litres to .95 litres = 950 ml).

Pressure Cooker Pasta Sauce after 40 mins

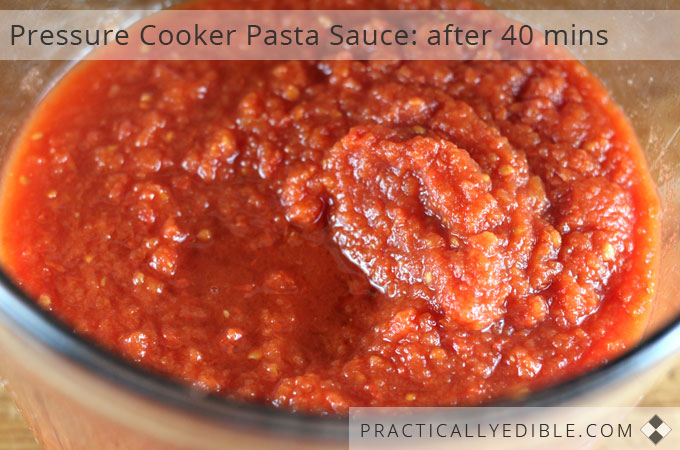
There it is above. It is thick enough for swirls in it to hold.

It’s quite thick and heavy; you’d almost think there were tomato paste in it.

In fact, it’s so thick that…..

Pressure Cooker Pasta Sauce after 40 mins

You literally can stand a spoon up in it!

That’s fantastic!

If you’re looking for something as thick as a sauce that came out of a commercial jar, 40 minutes is the timing you are after for this volume of raw tomato purée. You won’t be disappointed, and there is no need for tomato paste.

40 minutes in a Nutricook pressure cooker, anyway. Times may vary a bit either way in your pressure cooker.

Also, please note: I would speculate that the time required might have been longer if fresh veg that give off water had been added. Veg such as bell pepper, onion, zucchini, mushroom, eggplant, etc, because as they cooked and broke down, they would have released more water into the pot that needed to be cooked away.

Summary: 40 minutes on low pressure will turn 8 cups (2 US quarts / 64 oz / 1.9 litres) of fresh tomato purée into a very thick tomato sauce with no tomato paste needed. The yield was 4 cups / 32 oz / 950 ml.


PUMP UP THE VOLUME

I had 12 dozen tomatoes to process. When puréed, that yielded I think it was about 6 or 7 of those large measuring jugs. Anyway, if I processed one jug at a time through the pressure cooker, I was gonna be there all night. Literally.

Plus, in a real-life tomato sauce making situation, you have bazillions of tomatoes to process at once. When it rains tomatoes, it pours. It cascades. You don’t cook 2 or 3 cups of the stuff at a time.

So, I tripled the volume being cooked at one time. I wanted to go more than double, but I wanted to stay well under the safe fill line on the pressure cooker; as well, I didn’t want to scorch the bottom while I waited for a totally huge amount of liquid to come to temperature (always the worry in a pressure cooker.) So, I triple it was. A leap for sure, but not a totally crazy one.

No photos, as the evening was getting very late, and the magic was leaving the room on this topic, but here are the results.

I started with 24 cups / 192 oz / 5.7 litres of fresh tomato purée. Again, good rolling boil, stirring frequently, before the lid went on. Veg setting / low pressure.

After 15 minutes: 21 cups / 168 oz / 5 litres. Tomato juice.

After 40 minutes: 17 1/2 cups / 140 oz / 4.1 litres. Maybe just a tad thinner than what you’d describe as a “quick homemade sauce”. Usable, but most people would want thicker.

After 60 minutes: 15 cups / 112 oz / 3.3 litres. A thickish homemade style sauce, but the spoon won’t stand up yet.

After 85 minutes: 13 cups / 104 oz / 3 litres. A very thick sauce that the spoon will stand up in. We’re done here.

Summary: for a larger volume at once, a longer cooking time is needed. 24 cups / 192 oz / 5.7 litres of fresh tomato purée required 85 minutes of cooking time on low pressure. The yield was 13 cups / 104 oz / 3 litres.

Caution: If you are using a Nutricook, and you are doing a long session like this with a lot of liquid being expelled as steam, I would remove your Nutricook timer every 25 minutes or so to wipe away any water condensing under the timer. Just a quick wipe with a paper towel will do it and put it back in; don’t press the buttons to mess up the time. Better safe than sorry, as condensation can kill a Nutricook timer faster than you can say Jack Robinson.

Note: the cooking time might actually be quicker because I did start and stop the pressure cooker three times to record the ongoing results.